
BYD TANG

August 2022 - November 2024

86.4 kWhUseable Battery

360 kmReal Range

240 Wh/kmEfficiency

This electric vehicle is no longer for sale

A new model is available:
BYD TANG Flagship BYD TANG Flagship

Price

United Kingdom Not Available
The Netherlands €69,990
Germany €71,400

Available to Order

United Kingdom Not Available
The Netherlands Aug 2022 - Nov 2024
Germany Mar 2023 - Nov 2024
Prices shown are recommended retail prices for the specified countries and do not include any indirect incentives. Pricing and included options can differ by region and do not include any indirect incentives. Dates shown are order dates. Click on a country for more details.

Real Range between 260 - 525 km

City - Cold Weather 375 km
Highway - Cold Weather 260 km
Combined - Cold Weather 310 km
City - Mild Weather 525 km
Highway - Mild Weather 320 km
Combined - Mild Weather 405 km
Indication of real-world range in several situations. Cold weather: 'worst-case' based on -10°C and use of heating. Mild weather: 'best-case' based on 23°C and no use of A/C. For 'Highway' figures a constant speed of 110 km/h is assumed. The actual range will depend on speed, style of driving, weather and route conditions.
(Advertisement)

Long Distance Suitability
2 / 5

First Leg Distance 258 km
Charging Stop 0km
Second Leg Distance 90 km
Total Distance 348 km
First Leg Duration 2h 21min
Charging Stop 15 min
Second Leg Duration 49min
Total Duration 3h 25min
The 'long distance suitability' is a 5-star rating that indicates how suitable a vehicle is for long trips. The rating is based on the 1-Stop Range: the total distance a vehicle can cover with one charging stop of 15 minutes.

Battery

Nominal Capacity * 88.0 kWh
Battery Type Lithium-ion
Number of Cells 200
Architecture 800 V
Warranty Period 8 years
Warranty Mileage 250,000 km
Useable Capacity 86.4 kWh
Cathode Material LFP
Pack Configuration 200s1p
Nominal Voltage 640 V
Form Factor Prismatic
Name / Reference BYD BLADE

Charging

Home / Destination

Charge Port Type 2
Port Location Right Side - Rear
Charge Power 7.4 kW AC
Charge Time (0->360 km) 13h45m
Charge Speed 26 km/h

Fast Charging

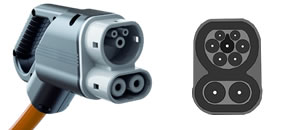
Charge Port CCS
Port Location Right Side - Rear
Charge Power (max) 120 kW DC
Charge Power (10-80%) 108 kW DC
Charge Time (36->288 km) 35 min
Charge Speed 430 km/h
Autocharge Supported Yes

Plug & Charge

Plug & Charge Supported No
Supported Protocol -

Battery Preconditioning

Preconditioning Possible No
Automatically using Navigation No
(Advertisement)

Performance

Acceleration 0 - 100 km/h 4.6 sec
Top Speed 180 km/h
Electric Range 360 km
Total Power 380 kW (517 PS)
Total Torque 680 Nm
Drive AWD

Bidirectional Charging (V2X / BPT)

Vehicle-to-Load (V2L)

V2L Supported No
Max. Output Power -
Exterior Outlet(s) -
Interior Outlet(s) -

Vehicle-to-Home (V2H)

V2H via AC Supported No
Max. Output Power -
V2H via DC Supported No
Max. Output Power -

Vehicle-to-Grid (V2G)

V2G via AC Supported No
Max. Output Power -
V2G via DC Supported No
Max. Output Power -

Energy Consumption

EVDB Real Range

Range 360 km
Vehicle Consumption 240 Wh/km
CO2 Emissions 0 g/km
Vehicle Fuel Equivalent 2.7 l/100km

WLTP Ratings

Range 400 km
Rated Consumption 238 Wh/km
Vehicle Consumption 216 Wh/km
CO2 Emissions 0 g/km
Rated Fuel Equivalent 2.7 l/100km
Vehicle Fuel Equivalent 2.4 l/100km
Rated = official figures as published by manufacturer. Rated consumption and fuel equivalency figures include charging losses.
Vehicle = calculated battery energy consumption used by the vehicle for propulsion and on-board systems.

Real Energy Consumption between 165 - 332 Wh/km

City - Cold Weather 230 Wh/km
Highway - Cold Weather 332 Wh/km
Combined - Cold Weather 279 Wh/km
City - Mild Weather 165 Wh/km
Highway - Mild Weather 270 Wh/km
Combined - Mild Weather 213 Wh/km
Indication of real-world energy use in several situations. Cold weather: 'worst-case' based on -10°C and use of heating. Mild weather: 'best-case' based on 23°C and no use of A/C. For 'Highway' figures a constant speed of 110 km/h is assumed. The energy use will depend on speed, style of driving, climate and route conditions.
(Advertisement)

Dimensions and Weight

Length 4870 mm
Width 1950 mm
Width with mirrors 2180 mm
Height 1725 mm
Wheelbase 2820 mm
Weight Unladen (EU) 2564 kg
Gross Vehicle Weight (GVWR) 3060 kg
Max. Payload 571 kg
Cargo Volume 940 L
Cargo Volume Max 1655 L
Cargo Volume Frunk 0 L
Roof Load 75 kg
Tow Hitch Possible Yes
Towing Weight Unbraked 750 kg
Towing Weight Braked 1500 kg
Vertical Load Max 80 kg

Weight Test (by Bjørn Nyland)

Weight Measured 2580 kg
Weight Distribution (F/R) 48% / 52%
Weight Front Axle 1240 kg
Weight Rear Axle 1340 kg

Miscellaneous

Seats 7 people
Isofix Yes, 2 seats
Turning Circle 11.8 m
Platform No Data
EV Dedicated Platform No Data
Car Body SUV
Segment JE - Executive
Roof Rails Yes
Heat pump (HP) Yes
HP Standard Equipment Yes
* = estimated value. Average energy consumption and range based on moderate drive style and climate. Real-life values may differ significantly. Pricing information might not be actual for some regions. No rights can be derived from the information on this site.

Home and Destination Charging (0 -> 100%)

Charging is possible by using a regular wall plug or a charging station. Public charging is always done through a charging station. How fast the EV can charge depends on the charging station (EVSE) used and the maximum charging capacity of the EV. The table below shows all possible options for charging the BYD TANG. Each option shows how fast the battery can be charged from empty to full.

Europe

Charging an EV in Europe differs by country. Some European countries primarily use 1-phase connections to the grid, while other countries are almost exclusively using a 3-phase connection. The table below shows all possible ways the BYD TANG can be charged, but some modes of charging might not be widely available in certain countries. This vehicle is fitted with different standard on-board chargers depending on the country. Both configurations are shown below.

Type 2 (Mennekes - IEC 62196)
Charging Point Max. Power Power Time Rate
Standard 7.4 kW On-Board Charger
Wall Plug (2.3 kW) 230V / 1x10A 2.3 kW 44h15m 8 km/h
1-phase 16A (3.7 kW) 230V / 1x16A 3.7 kW 27h30m 13 km/h
1-phase 32A (7.4 kW) 230V / 1x32A 7.4 kW 13h45m 26 km/h
3-phase 16A (11 kW) 230V / 1x16A 3.7 kW † 27h30m 13 km/h
3-phase 32A (22 kW) 230V / 1x32A 7.4 kW † 13h45m 26 km/h
Standard 6.6 kW On-Board Charger
Wall Plug (2.3 kW) 230V / 1x10A 2.3 kW 44h15m 8 km/h
1-phase 16A (3.7 kW) 230V / 1x16A 3.7 kW 27h30m 13 km/h
1-phase 32A (7.4 kW) 230V / 1x29A 6.6 kW † 15h30m 23 km/h
3-phase 16A (11 kW) 230V / 1x16A 3.7 kW † 27h30m 13 km/h
3-phase 32A (22 kW) 230V / 1x29A 6.6 kW † 15h30m 23 km/h

† = Limited by on-board charger, vehicle cannot charge faster.

Both on-board chargers above are fitted as standard equipment. The on-board charger installed depends on the country where the vehicle is sold. Check local specifications for details.

(Advertisement)

Fast Charging (10 -> 80%)

Rapid charging enables longer journeys by adding as much range as possible in the shortest amount of time. Charging power will decrease significantly after 80% state-of-charge has been reached. A typical rapid charge therefore rarely exceeds 80% SoC. The rapid charge rate of an EV depends on the charger used and the maximum charging power the EV can handle. The table below shows all details for rapid charging the BYD TANG.

  • Max. Power: maximum power provided by charge point
  • Avg. Power: average power provided by charge point over a session from 10% to 80%
  • Time: time needed to charge from 10% to 80%
  • Rate: average charging speed over a session from 10% to 80%
Combined Charging System (CCS Combo 2)
Charging Point Max. Power Avg. Power Time Rate
CCS (50 kW DC) 50 kW 50 kW 76 min 190 km/h
CCS (150 kW DC) 120 kW † 108 kW † 35 min 430 km/h
Charge Curve

Data made available by Fastned

This vehicle supports Autocharge
This vehicle does not support Plug & Charge

† = Limited by charging capabilities of vehicle

Autocharge: allows for automatic initiation of a charging session at supported CCS charging stations.

Plug & Charge: allows for automatic initiation of a charging session at supported CCS charging stations in accordance with ISO 15118.

Actual charging rates may differ from data shown due to factors like outside temperature, state of the battery and driving style.

BYD Claimed Specifications

The table below shows the claimed specifications from the manufacturer for charging the BYD TANG. The specifications can differ from the table above for a variety of reasons. If real-world charge tests are available, these differences can be signifcant. If no real-world tests are available, the table above will be based on the manufacturer specifications as per the table below.

  • Max. Power: maximum charge power during charging session
  • Charge From: battery percentage (% SoC) where charging session is started
  • Charge To: battery percentage (% SoC) where charging session is ended
  • Time: time needed for charging session
BYD Claimed Specifications
Max. Power Charge From Charge To Time
120 kW 30 % 80 % 30 min

Long Distance Suitability

How suitable an electric car is for long trips depends not only on the range. How quickly the car can charge plays an almost equally important role. Whether an EV is suitable for long trips depends on the battery capacity, efficiency, and fast charging capability.

To easily compare cars among each other, a benchmark has been established that combines these factors into the total distance a vehicle can cover with one 15-minute charging stop: the '1-Stop Range'. Based on the 1-Stop Range, the 5-star rating is determined. The result of the benchmark is shown in the graph below.

1-Stop Range

+

5-Star Rating

+

Revision of Rating

+

BYD TANG
2 / 5

0
1
2
3
4
5
288 km
2h 37min
15 min
100 km
55min
258 km
2h 21min
15 min
90 km
49min
348 km (3h 25min)
234 km
2h 8min
15 min
82 km
44min
316 km (3h 7min)
0 km
100
200
300
400
500
600
700
800
Mild Weather
388 km 1-Stop Range
Average Conditions
348 km 1-Stop Range
Cold Weather
316 km 1-Stop Range
(Advertisement)
Vehicle 1
Vehicle 2
Vehicle 3
Vehicle 4
Compare